Zul'Gurub: Difference between revisions
Jump to navigation
Jump to search
No edit summary |
|||
| (9 intermediate revisions by the same user not shown) | |||
| Line 1: | Line 1: | ||
=== Attunement | === Attunement === | ||
1. Stranglethorn Vale - | 1. '''Stranglethorn Vale''' - Kill High Priestess Hai'watna to receive 'Broken Key' [Note can not be in raid or will not drop.]. Turn in to Yojamba Isle (Moved to bottom right of STV) | ||
2. | 2. '''''Broken Key''''' - Collect mojo from various Troll/Ogre Mobs on world map and gather a Blue Sapphire | ||
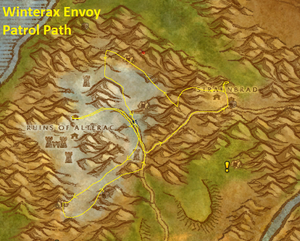
* Winterax Troll Mojo - [Alterac Mountains] - Winterax Envoy, wanders along the main road in Alterac (The stretch of road north of Tarren Mill to Syndicate mob town) between the Yeti and the village of the trolls | * ''Winterax Troll Mojo'' - [Alterac Mountains] - Winterax Envoy, wanders along the main road in Alterac (The stretch of road north of Tarren Mill to Syndicate mob town) between the Yeti and the village of the trolls | ||
* [[File:Winterax Envoy.png|frameless]] | * [[File:Winterax Envoy.png|frameless]] | ||
* Deadwind Ogre Mojo - [Deadwind Pass] - Ogres east of Karazhan (10% drop chance approx) | * ''Deadwind Ogre Mojo'' - [Deadwind Pass] - Ogres east of Karazhan (10% drop chance approx) | ||
* Mossflayer Troll Mojo - [Eastern Plaguelands] - Trolls in Zul`Mashar (Top Right Corner of Map) | * ''Mossflayer Troll Mojo'' - [Eastern Plaguelands] - Trolls in Zul`Mashar (Top Right Corner of Map) | ||
* Turn in all Mojos and Blue Sapphire (AH/ | * Turn in all Mojos and Blue Sapphire (AH/world mob drop/Mining Nodes @ low chance) to Yojamba Isle | ||
3. | 3. '''''Broken Key''''' - Collect mojo from Troll Bosses/Elites in instances and Hinterlands. | ||
* [Hinterlands] - Jintha'alor in the cave with the Hakkar egg from the priestess | * [Hinterlands] - Jintha'alor in the cave with the Hakkar egg from the priestess | ||
| Line 16: | Line 16: | ||
* [Temple of Atal'Hakkar (ST)] - Atal'alarion (Troll Berserker in the center pool that appears after clicking the statues) | * [Temple of Atal'Hakkar (ST)] - Atal'alarion (Troll Berserker in the center pool that appears after clicking the statues) | ||
* Smolderthorn Troll Mojo - [Lower Blackrock Spire (15m)] - Master Voone | * Smolderthorn Troll Mojo - [Lower Blackrock Spire (15m)] - Master Voone | ||
4. Turn in at Yojamba Isle to receive the Mojo Filled Key. | 4. Turn in at Yojamba Isle to receive the 'Mojo Filled Key'. | ||
=== | === Main Bosses === | ||
Nameless Hermit | * [[High Priest Venoxis]] | ||
* [[High Priestess Jeklik]] | |||
* [[High Priestess Mar'li]] | |||
* [[High Priest Thekal]] | |||
* [[High Priestess Arlokk]] | |||
* '''''[[Azus the Bloodseeker|[NEW] Azus the Bloodseeker]]''''' | |||
* [[Hakkar]] | |||
=== Optional Bosses === | |||
* [[Bloodlord Mandokir|Bloodlord Mandokir & Ohgan]] | |||
* [[Edge of Madness]] | |||
* [[Gahz'ranka]] | |||
* [[Jin'do the Hexxer]] | |||
* '''''[[Nameless Hermit|[NEW] Nameless Hermit]]''''' | |||
=== Trash Mobs === | |||
==== Generic Trash ==== | |||
* '''Gurubashi Berserker''' - Level 62 | |||
** '''Health:''' ~133,134; '''Armor:''' 4,860; '''FR''': 24 '''NR''': 66 '''FrR''': 24 '''SR''': 24 '''AR''': 24 | |||
** '''Damage:''' 1,374 - 1,603 @ 1.000 | |||
* '''Gurubashi Champion''' - Level 61 | |||
** '''Health:''' ~61,186; '''Armor:''' 8,200; '''FR''': 115 '''NR''': 180 '''FrR''': 115 '''SR''': 180 '''AR''': 37 | |||
** '''Damage:''' 1,631 - 1,805 @ 1.800 | |||
* '''Gurubashi Axe Thrower''' - Level 60 | |||
** '''Health:''' ~62,432; '''Armor:''' 4,422; '''FR''': 27 '''NR''': 54 '''FrR''': 27 '''SR''': 27 '''AR''': 16 | |||
** '''Damage:''' 1,200 - 1,440 @ 1.000 [Note: Prioritizes casting over attacking always] | |||
* Hakkari Priest | |||
* Hakkari Blood Priest | |||
* Gurubashi Headhunter | |||
* Hakkari Witch Doctor | |||
* Hooktooth Frenzy | |||
* Zulian Crocolisk | |||
* Razzashi Adder | |||
* Razzashi Serpent | |||
==== Bat Trash Mobs ==== | |||
* Gurubashi Bat Rider | |||
* Bloodseeker Bat | |||
==== Spider Trash Mobs ==== | |||
* Razzashi Broodwidow | |||
* Razzashi Skitterer | |||
* Razzashi Venombrood | |||
* Hakkari Shadowcaster | |||
==== Raptor Trash Mobs ==== | |||
* Razzashi Raptor | |||
==== Tiger Trash Mobs ==== | |||
* Zulian Tiger | |||
* Zulian Cub | |||
==== Panther Trash Mobs ==== | |||
* Zulian Panther | |||
* Zulian Stalker | |||
* Hakkari Shadow Hunter | |||
==== Soulflayer's Altar Trash Mobs ==== | |||
* Son of Hakkar | |||
* Soulflayer | |||
==== Jin'do Trash Mobs ==== | |||
* Atal'ai Mistress | |||
* Withered Mistress | |||
* Sacrificed Troll | |||
* Voodoo Slave | |||
==== Madness Trash Mobs ==== | |||
* Mad Servant | |||
Latest revision as of 01:33, 12 July 2025
Attunement
1. Stranglethorn Vale - Kill High Priestess Hai'watna to receive 'Broken Key' [Note can not be in raid or will not drop.]. Turn in to Yojamba Isle (Moved to bottom right of STV)
2. Broken Key - Collect mojo from various Troll/Ogre Mobs on world map and gather a Blue Sapphire
- Winterax Troll Mojo - [Alterac Mountains] - Winterax Envoy, wanders along the main road in Alterac (The stretch of road north of Tarren Mill to Syndicate mob town) between the Yeti and the village of the trolls
- Deadwind Ogre Mojo - [Deadwind Pass] - Ogres east of Karazhan (10% drop chance approx)
- Mossflayer Troll Mojo - [Eastern Plaguelands] - Trolls in Zul`Mashar (Top Right Corner of Map)
- Turn in all Mojos and Blue Sapphire (AH/world mob drop/Mining Nodes @ low chance) to Yojamba Isle

3. Broken Key - Collect mojo from Troll Bosses/Elites in instances and Hinterlands.
- [Hinterlands] - Jintha'alor in the cave with the Hakkar egg from the priestess
- [Zul'Farrak]- Chief Ukorz Sandscalp (Last boss of instance)
- [Temple of Atal'Hakkar (ST)] - Atal'alarion (Troll Berserker in the center pool that appears after clicking the statues)
- Smolderthorn Troll Mojo - [Lower Blackrock Spire (15m)] - Master Voone
4. Turn in at Yojamba Isle to receive the 'Mojo Filled Key'.
Main Bosses
- High Priest Venoxis
- High Priestess Jeklik
- High Priestess Mar'li
- High Priest Thekal
- High Priestess Arlokk
- [NEW] Azus the Bloodseeker
- Hakkar
Optional Bosses
Trash Mobs
Generic Trash
- Gurubashi Berserker - Level 62
- Health: ~133,134; Armor: 4,860; FR: 24 NR: 66 FrR: 24 SR: 24 AR: 24
- Damage: 1,374 - 1,603 @ 1.000
- Gurubashi Champion - Level 61
- Health: ~61,186; Armor: 8,200; FR: 115 NR: 180 FrR: 115 SR: 180 AR: 37
- Damage: 1,631 - 1,805 @ 1.800
- Gurubashi Axe Thrower - Level 60
- Health: ~62,432; Armor: 4,422; FR: 27 NR: 54 FrR: 27 SR: 27 AR: 16
- Damage: 1,200 - 1,440 @ 1.000 [Note: Prioritizes casting over attacking always]
- Hakkari Priest
- Hakkari Blood Priest
- Gurubashi Headhunter
- Hakkari Witch Doctor
- Hooktooth Frenzy
- Zulian Crocolisk
- Razzashi Adder
- Razzashi Serpent
Bat Trash Mobs
- Gurubashi Bat Rider
- Bloodseeker Bat
Spider Trash Mobs
- Razzashi Broodwidow
- Razzashi Skitterer
- Razzashi Venombrood
- Hakkari Shadowcaster
Raptor Trash Mobs
- Razzashi Raptor
Tiger Trash Mobs
- Zulian Tiger
- Zulian Cub
Panther Trash Mobs
- Zulian Panther
- Zulian Stalker
- Hakkari Shadow Hunter
Soulflayer's Altar Trash Mobs
- Son of Hakkar
- Soulflayer
Jin'do Trash Mobs
- Atal'ai Mistress
- Withered Mistress
- Sacrificed Troll
- Voodoo Slave
Madness Trash Mobs
- Mad Servant